CCD Image Processing
Beginning with a set of raw images, many
stages of
image manipulation
are needed to produce the final image. The following
description is a process that seems to work good for me, but without a
doubt, could be
improved upon.
At least 3 major processing phases usualy occur to combine an
evening's set of raw images into a final color image. An
imaging session typically results in a few to several dozen raw
images, all taken of the same target and using a variety of light
filters. The process begins with image reduction: the removal
of electronic noise in the camera, the removal of 'dust donuts' and
other optical anomolies, and the correction of hot and cold
pixels. Stage 2 aligns the many separate images
of red, green, blue, and luminance or hydrogen alpha, and combines each
of them together as master reds, greens, etc.
The next phase deals with combining the color layers into a composite,
and finaly adjusting them further if necessary to darken the background
or
brighten the midrange, sharpen the imate or many other possible tweaks.
The following topics are discussed below:
Freezing the Camera
Shooting the Raw Imaging Set
Image Reduction - Dark Subtraction
Image Reduction - Flat Field Subtraction
Image Reduction - Hot and Cold Pixel Removal
Align Images - Pick a Star
Layer Combine - All the Reds, or
Greens, etc
RGB Combine - First Look at the Target's Colors
Luminance Combine - Clear or Hydrogen Alpha
LRGB Combine - Add the
Luminance's
Detail to the Color Image
Final Image Adjustments - Enhance, Crop, Resize, Done!
Freezing the Camera
An interesting characteristic of the CCD chip is that it works
better as it gets colder. A slight amount of noise is
introduced by the CCD itself, but, the signal to noise ratio actually
improves as the chip cools down. The camera has a built-in
bi-metalic refridgeration device that exhausts head with a fan.
This allows it to cool the CCD chip to about 35 degrees C below the air
temperature. There is an optional water pump system that
pumps cold water through the camers to remove heat more efficiently
allowing another 10 degrees C temperature drop.
In actual use during the summer, the camera operates at about 10
degrees below zero Celcuis. In the winter it has imaged at
-40, but I normally don't operate it below -30.
Shooting the
Raw Image Set
Each color layer in a set of images is made up of 4 or more
individual shots. For all deep sky objects, longer exposure
time
means better image. Once the scope is aligned, focused and
autoguiding, it is time to finaly start shooting raw
pictures.
CCDSoft can take a sequence of images that make up a set that will be
processed
later on. Typically all shots are 5, 10 or 15 minutes long and
in the quantity as follows: luminance (clear or hydrogen alpha
filter) 4 to 10 individual exposures, red 3 or 4, green 3 or 4,
blue 3 or
4. This combination of shots can result in 2 or
3 hours of almost continuous exposure on a target
object. It will take another 2 or 3 hours of
processing on a PC to make the final composite
image.
Image
Reduction - Dark Subtract
The electronics in CCD cameras produce a small amount of
'noise'. This has a cumulative effect where it accumulates
over time, becoming a significant source of errors in the image.
Your digital camera does it too, but you don't see it because your
shots are maybe 1/60 of a second instead of 10 minutes, so there is
little accumulation time for the noise to grow, in addition,
there is an extremely small amout of light being recieved from typical
astronomical targets, often not very far above the noise floor; not
exactly as bright as daylight on Earth.
A Dark Image is simply a regular light shot except that the shutter
remains closed so no light gets in. The dark is exposed at
the same CCD camera temperature and the same exposure time as the
corresponding light shot. A series of 9 dark shots
are taken for each temp/time to correspond with the light images to be
processed. The 9 darks are averaged to create a Master
Dark.
The master dark is mathematicaly subtracted from a light shot of the
same temp/time. The result is an image that no longer shows
the effects of electronics noise. Since darks are time consuming
to take and process, it is fortunate that they only need to be taken
once. My Master Dark Library now consists of
master darks for -10, -15, -20, -25 and -30 degrees C, and for 1, 2, 5,
10, 15, 20 and 30 minutes at each temperature.
Image
Reduction - Flat Field
Flat fields are not always required, usualy helpful when there
is a modest (or more) of the Moon illuminating the atmosphere, and/or
when the sky is hazy. During these conditions, dust or
moisture anywhere on the telescope's or camera's optics shows up on the
image a 'little dark donuts'. These can be eliminated
with a process similar to dark subtraction. I
use a sheet of white paper that is simply folded at the top two corners
and will sit on the end of the scope's dew shield with the telescope
aimed about level. An indirect low light is cast on the
paper and then an exposure is taken. This is often a shot
of 5 to 10 seconds. Once the time is chosen, a set of 9 flat
field images is taken. Another set of 9
darks of the same time is taken so the flats can be dark subtracted.
Once the flats are dark subtracted, they are averaged into a master
flat. The flat field reduction routine in CCDSoft
does the rest. It cleans up not only the dust donuts, but
also vignetting that might be occuring.
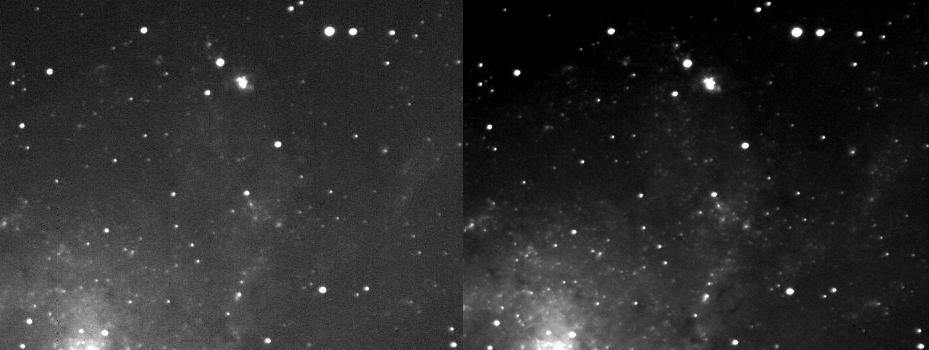
The picture below is a sample showing a single flat field image on the
left and a master flat field (the average of 9 flats) on the
right. The benefit of averaging multiple shots is quite apparent.

Image Reduction
- Hot and
Cold
Pixel Removal
Even after doing dark and flat field subtracts, there are always still some
waascully pixels that need to be tamed. The Remove
Hot Pixel and Remove Cold Pixel functions do the trick.
Align
Images - Pick a Small
Star
When combining multiple images, they may not all stack on top of
one another exactly. Aligning images allow them to be
combined. Pick one of the smallest stars that can be easily
identified in all
images to be combined. CCDSoft provides a tool to select
and center a crosshair on the star in each image, then align all of
them at once.
Layer Combine
- All the Reds, or
Greens, etc
If there are only 1 or
2
images of each color then just combine them manually. If
there are 3
or more images for each layer such as luminance, then I same them in
their own directory (aptly named lum, or red, etc) and use the combine
folder
function. At this point there is a single composite image
for each of the red, green, blue and probably luminance layers.
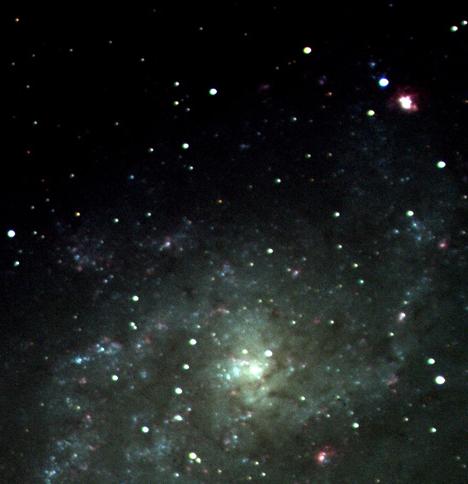
The three images below are each a 5 minute exposure and are left to
right, red, green and blue:
RGB Color
Combine - First Look at
the
Target's Colors
This is where the three rgb color components are first
glued together in a computer. It's also where image
processing techniques begin to differ significantly.
CCDSoft is used to combine the r g and b layers together to create a
color image which is saved as a .tif file.
Luminance
Combine - Clear Or
Hydrogen Alpha
Typically after raw image cleanup, there are usualy from
3 to 15 images to combine into a single master luminance.
The CCDSoft options to combine them all at once are: add, average
or median combine. The difference is subtle and
depends on the target and image but I often prefer median
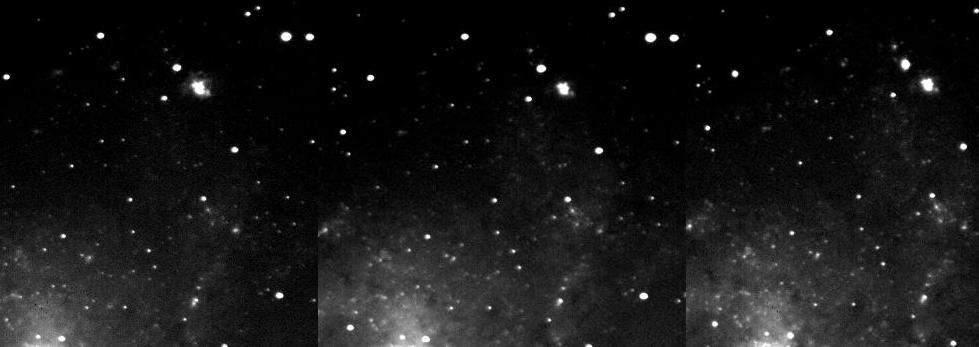
combine. The following image shows a sample comparison
between a single image and when nine were combined
together. This is a portion of M33, all 9 luminance
exposures were 5 minutes each.
LRGB Combine -
Add the
Luminance's
Detail to the Color Image
Graphics programs like Photoshop do an outstanding job of doing
the Luminance layer with the RGB layer, I use a open source code
program called GIMP that does the same combining and adjustment to
create the finished image.
Final
Image Adjustments -
Enhance, Crop, Resize, Done!
This final task is controlled by taste. Every
computer screen shows the image a little different and there are dozens
of ways to fine tune an image. What are the right choices and how
much influence should be used on the image? Things like sharpen,
gamma correction, histogram curves, contrast, R G and B curves,
deconvolution a just a few. I havent even found them all
yet.
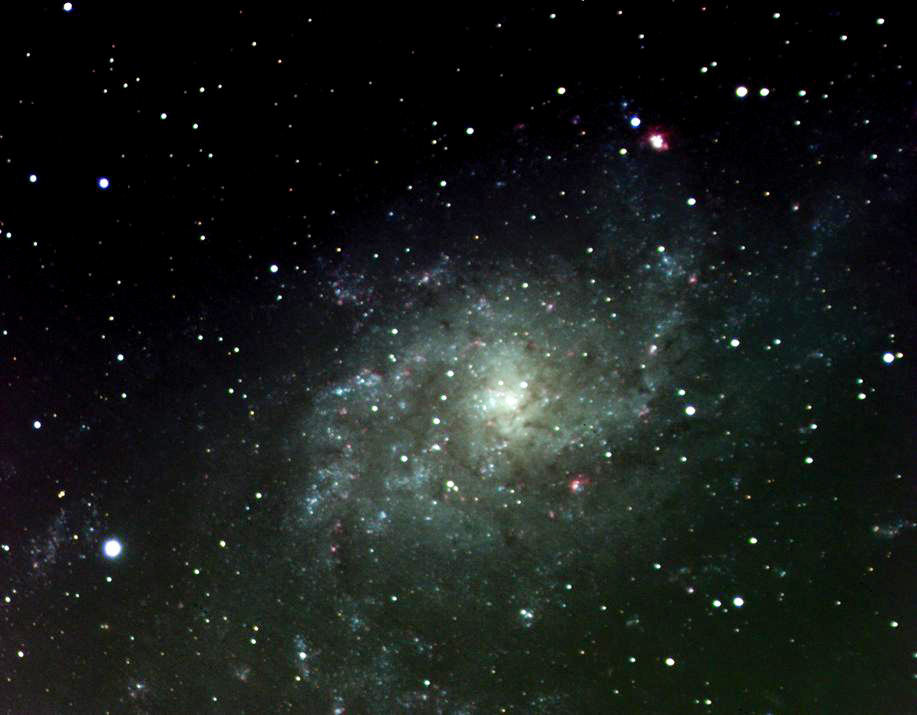
The following image of M33 shows the final
composite: